Grub (GRand Unified Bootloader) is the default boot loader application for most Linux/Unix systems. It lets users choose from multiple operating systems (provided you have more than one operating systems installed on your system) or boot into different kernel versions if your computer system is running only Linux operating system. If there is any corruption with this application, your computer system will depict errors during boot process and most probably it won’t boot your into your operating system(s). It is not uncommon to encounter Grub’s corruptions, if you see your system complaining about boot/boot loader errors, the only fix is to repair or re-install your system’s Grub boot loader. If followed properly, this process won’t cause any data loss on your hard disk. Today, we will learn how to repair/re-install Grub Boot loader on Ubuntu system. The below mentioned process was followed on Ubuntu 16.04, but it should work on any previous or newer versions of Ubuntu too. We will be using a well known tool “Boot Repair” to accomplish this task.
Installing Boot Repair on Ubuntu
Boot Repair is the most commonly used tool to fix errors regarding Grub boot loader. First of all arrange a Live CD/DVD/ USB for Ubuntu and boot your system using this media (If you are looking to repair Grub, chances are you are already on the stage where system is un-bootable into current operating system, so yes its a valid request to use Live CD/DVD/USB at this point ).
Once you are logged into your system using Live disk, run following command to add “Boot Repair” tool’s PPA to your system.
Once PPA has been added, run following command to update APT package manager.
Run following command to install Boot Repair tool now.
That’s it, Boot Repair has been installed successfully now. Launch it from Applications > Boot Repair option.
 Using Boot Repair to fix Grub
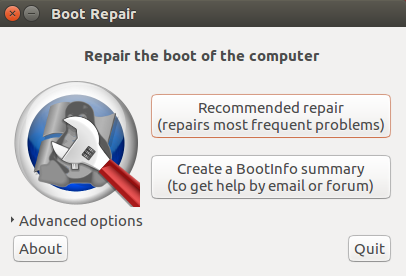
One Boot Repair tool is launched from Unity > Applications > Boot Repair option, here is the welcome screen you should see.
The very first option (Recommended repair) should fix the Grub loader for you, hit it and it should initiate the repair/re-install process for you. Here is the first screen it will display.
As instructed in the above screenshot, launch your system’s terminal and run following three commands in order.
Once above mentioned command’s execution complete, click “Forward” to take the repair process to the next step. Here is what you will be seeing on next step,.
As instructed, run following three commands on the terminal in proper order. During this step, it will load a pop up to confirm Grub 2 removal, choose “Yes” from the pop up you see here.
Click “Forward” once this process completes, here is the screenshot of the next step.

That’s it, it will take couple of minutes to perform the required operations and you should see the following success message upon completion ; congratulations! Grub has been repaired now.
Reboot your system and it should boot fine and boot loader related errors should be gone now.
Conclusion
There might be many reasons for broken Grub, especially if you are running multiple operating systems or your system faced power down issues during important updates/installation processes. It’s good to have such a nice, free application like Boot Repair, as it helps resolving boot issues with your system. Hope you enjoyed this article, do let us know in comments please and don’t forget to share this article on social network and like our social network pages.


