Introduction
Security Onion is a Linux distribution for intrusion detection, network security monitoring, and log management. It’s based on Ubuntu and contains Snort, Suricata, Bro, Sguil, Squert, Snorby, ELSA, Xplico, Network Miner, and many other security tools. Security Onion is a platform that allows you to monitor your network for security alerts. It’s simple enough to run in small environments without many issues and allows advanced users to deploy distributed systems that can be used in network enterprise type environments.
Security Onion Layers
- Ubuntu based OS
- Snort, Suricata
- Snorby
- Bro
- Sguil
- Squert
- ELSA
- NetworkMiner
- PADS
And Many Other tools…
Snort/Suricata
- Snort and Suricata are NIDS Engine.
Snort
- Snort is an open source network intrusion detection and prevention system (IDS/IPS)
Suricata
- Suricata is a high performance Network IDS/IPS and network Security Monitoring system.
IDS Engines
- Highly scalable
- Protocol Identification
- File Identification
- MD5 Checksums
- File Extraction
Snorby
Web frontend of network security’s monitoring.
- Metrics and reports
- Classifications
- Full Packet
- custom setting
- Hotkeys
Bro
- High-level semantic analysis at the application
- site-specific monitoring policies Sguil
- It is an analysis console for security’s monitoring
- Its a powerful for Event analysis, Coreleation and review Squert
- A web interfaces to query and to view Sguil event data and is a visual tools
- Bro is a powerful network analysis framework
ELSA
ELSA is a centralized system log framework built on System log-NG, MySQL, and Sphinx full-text search. It provides a fully asynchronous web-based query interface that normalizes logs and makes searching billions of them for arbitrary strings as easy as searching the web. It also includes tools for assigning permissions for viewing the logs as well as email based alerts, scheduled queries, and graphing.
Step 1: Installing Security Onion
Download Security Onion ISO image from http://securityonion.blogspot.com/. I used the direct download link from Sourceforge. When the download is finished. After that, this ISO Image burn the CD. This CD Insert the DVD ROM. Then boot the machine. Then wait few second…
When ready to install the system, select the install script on the desktop.
When Click Install security Onion 12.4. Then Preparing to Install and given two check box true value.
The installer will prompt you on how you would like to partition the hard drive. Select Erase disk and Install security Onion.
Now Given Username and Password of the system. No need to select encrypted my home folder and click Continue.
When the installation is complete you will be prompted to reboot your system.
Step 2: Updating the Security Onion
When the installation is complete and the system reboots, you will need to update the Ubuntu OS components as well as the Security Onion components. Wait few second or Open Terminal prompt and write the update command..
sudo apt-get update
After that look at the menu bar, select “Check for updates”. When the process is complete, go back to the menu bar, and select “Install all updates”
When all updates have finished installing, restart the system.
Step 3: Updating Security Onion
Now we will update the Security Onion components. This will update the latest scripts and security tools used inside the Security Onion platform.
Now Open Terminal. Then Write the command
sudo su
sudo apt-get update
sudo apt-get install securityonion-pfring-module
The update procedure will take a few minutes.
Step 4 : Setting up Security Onion
Double click on the install script on the desktop.
Now enter your root password.
You will prompted to configure network interfaces. Select yes.
You will be asked to chose your management interface. This is the interface that will have an IP address and be used to manage the system.
You will be asked to configure the interface for static IP settings or DHCP. In most cases you will want to configure static IP addresses. However, I configured DHCP.
The system will prompt you to reboot when complete.
When the system reboots, click on the setup icon on the desktop again.
You may Skip the network setup since it is already completed.
You will need to select to install Security Onion as a distributed system or chose the Quick Setup option. We will select the Quick Setup option.
You will need to create a username that will be used to log into and use the Sequill, Squert, and ELSA tools.
User Name like this: johor
You will be asked for an email address. This is the username you will use to log into Snorby. Snorby is going to one the primary interfaces we will use to monitor Snort.
Email Like this: mailofjohor@gmail.com
You will be asked to create a password. The system only accepts alphanumeric passwords, so you cannot use special characters.
Password like this: password
Enable ELSA
The system will finish configuring Security Onion tools.
Congratulations you have installed Security Onion
Step 5 : Using Security Onion
The first thing we will want to do is update the Snort rules in Security Onion. Open up a terminal window and enure you have root privileges. We used the sudo su command to change over to root.
The command will update the rules.
sudo /usr/bin/rule-update
Next, we will launch Snorby. You can simply double click on the Snorby icon on the desktop. You will use the email address and password you created during the setup script in Step 4 to login.
Example :
E-mail address: mailofjohor@gmail.com
Password: password
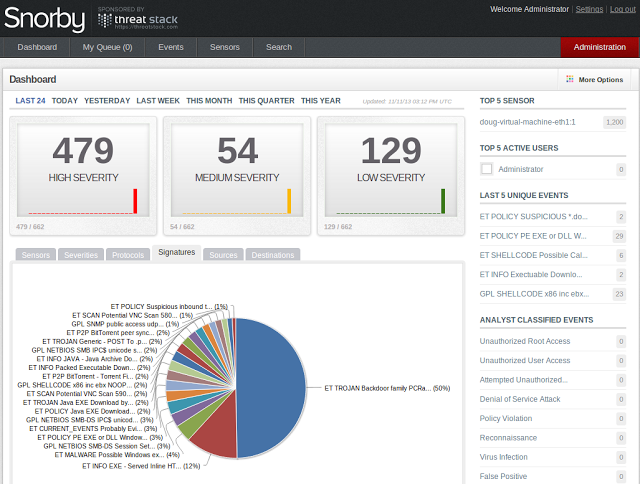
This is Monitoring Interface for Snorby
Congratulations, you have successfully setup Security Onion, configured Snort to monitor your data, and are using Snorby to view alerts.
Enjoy!!


