
Our goals is install, configure and use Ansible software in Ubuntu 14.04 x64. With this software you can control and manage a lot of Linux/UNIX servers as puppet from management server. The difference is puppet is written with Ruby but, ansible is written with Python programming language. Commands in puppet and ansible is different but global scheme is the same. One big difference is ansible using SSH key for authorization on client machines (puppet is install agents on client machines) and all configurations going through ssh. For that, before all you must generate SSH key on master server and send public key for all client machines.
In our configuration we will use 5 servers. They are ansmaster and node1ans, node2ans, node3ans, node4ans.
Our network topology will be as following:
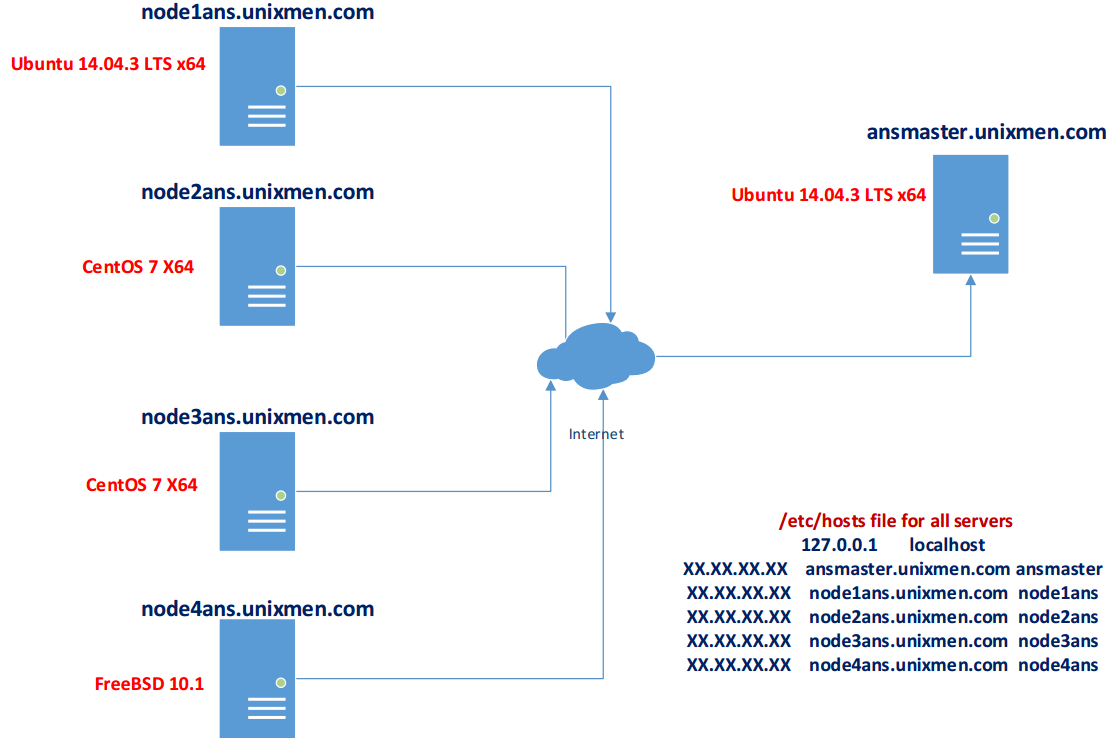
Firstly we must install and configure master server ansmaster.unixmen.com
Update, install repositories/packages and install new repositories for ansible.
root@ansmaster:~# apt-get update
root@ansmaster:~# apt-get dist-upgrade
root@ansmaster:~# apt-add-repository ppa:ansible/ansible -y
gpg: keyring `/tmp/tmpwvqe7axu/secring.gpg’ created
gpg: keyring `/tmp/tmpwvqe7axu/pubring.gpg’ created
gpg: requesting key 7BB9C367 from hkp server keyserver.ubuntu.com
gpg: /tmp/tmpwvqe7axu/trustdb.gpg: trustdb created
gpg: key 7BB9C367: public key “Launchpad PPA for Ansible, Inc.” imported
gpg: Total number processed: 1
gpg: imported: 1 (RSA: 1)
OK
root@ansmaster:~# apt-get update && sudo apt-get install ansible -y
Look at ansible version.
root@ansmaster:~# ansible –version
ansible 1.9.4
configured module search path = None
Create key on our ansmaster server.
root@ansmaster:~# ssh-keygen -t rsa -b 4096 -C “ansmaster@unixmen.com”
Generating public/private rsa key pair.
Enter file in which to save the key (/root/.ssh/id_rsa):
Created directory ‘/root/.ssh’.
Enter passphrase (empty for no passphrase):
Enter same passphrase again:
Your identification has been saved in /root/.ssh/id_rsa.
Your public key has been saved in /root/.ssh/id_rsa.pub.
The key fingerprint is:
45:7a:75:d1:2e:24:c6:2e:35:1a:d3:ac:e3:4a:54:f9 ansmaster@unixmen.com
The key’s randomart image is:
+–[ RSA 4096]—-+
| .=. oo |
| o=.O.. .|
| ..oX + . |
| .o= E . .|
| .S. o . |
| . . |
| . . |
| . |
| |
+—————–+
Copy already created pubic key to other servers with scp command.
Note: First time in yours ansmaster server you must try to connect with ssh to localhost, after write yes and click to Enter button(after that you can break connection with Ctrl+C). This will automatically create ~/.ssh folder. We need this is for known_hosts file. When you first time try to connect to any machines, automatically creates ~/.ssh folder and ~/.ssh/known_hosts file. We must do this operation on all client nodes too.
root@ansmaster:/root/.ssh# ssh node1ans
root@ansmaster:/root/.ssh# ssh node2ans
root@ansmaster:/root/.ssh# ssh node3ans
root@ansmaster:/root/.ssh# ssh node4ans
For description we will copy public key with our hostname:
root@ansmaster:~# cd /root/.ssh/
root@ansmaster:/root/.ssh# cp id_rsa.pub `hostname`.id_rsa.pub
Copy pubic key from ansmaster server with scp command to all client machines ~/.ssh folder (On Ubuntu client machine you must firstly copy to user home folder and after from sudo user copy this key to /root/.ssh folder):
root@ansmaster:/root/.ssh# scp ansmaster.id_rsa.pub jamal@node1ans:/home/jamal/
root@ansmaster:/root/.ssh# scp ansmaster.id_rsa.pub root@node2ans:/root/.ssh/
root@ansmaster:/root/.ssh# scp ansmaster.id_rsa.pub root@node3ans:/root/.ssh/
root@ansmaster:/root/.ssh# scp ansmaster.id_rsa.pub root@node4ans:/root/.ssh/
Then you must copy this key to authorized_keys file in the ~/.ssh/ folder(Before that go to the /root/.ssh folder on all client machines):
root@node1ans:/# cd /root/.ssh/
root@node1ans:/root/.ssh# cat ansmaster.id_rsa.pub >> authorized_keys
[root@node2ans ~]# cd /root/.ssh/
[root@node2ans .ssh]# cat ansmaster.id_rsa.pub >> authorized_keys
[root@node3ans ~]# cd /root/.ssh/
[root@node3ans .ssh]# cat ansmaster.id_rsa.pub >> authorized_keys
root@node4ans:~ # cd /root/.ssh/
root@node4ans:~/.ssh # cat ansmaster.id_rsa.pub >> authorized_keys
Create client nodes.
Firstly we will create node1ans.unixmen.com.
Update repositories for Ubuntu node1ans:
root@node1ans:~# apt-get update && apt-get dist-upgrade -y
Update repositories for CentOS node2ans and node3ans:
[root@node2ans ~]# yum upgrade -y
Note: On CentOS7 servers if you will choose Basic server, there are will not network utilities. You must install them.
[root@node2ans ~]# yum install net-tools -y
Note: On CentOS7 servers disable SeLinux and Firewall. We will change the line as SELINUX=disabled in node2ans and node3ans servers /etc/selinux/config configuration file(reboot after changes).
[root@node2ans ~]# systemctl disable firewalld
rm ‘/etc/systemd/system/dbus-org.fedoraproject.FirewallD1.service’
rm ‘/etc/systemd/system/basic.target.wants/firewalld.service’
[root@node2ans ~]# systemctl stop firewalld
[root@node3ans ~]# systemctl disable firewalld
[root@node3ans ~]# systemctl stop firewalld
For FreeBSD client machine update repositories:
root@node4ans:~ # portsnap fetch extract update
Answer yes for all questions:
root@node4ans:~ # pkg update
root@node4ans:~ # pkg upgrade
Install Python27 from the ports:
root@node4ans:~ # cd /usr/ports/lang/python27
root@node4ans:~ # make config
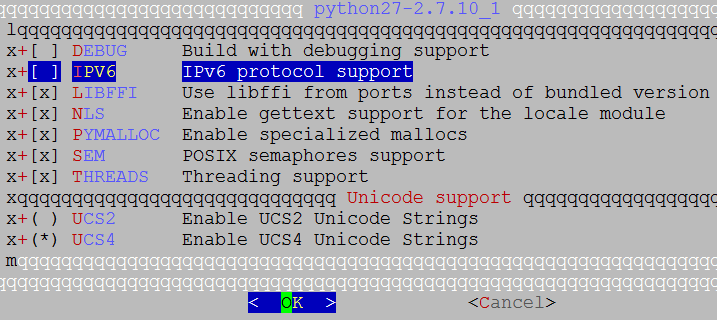
root@node4ans:~ # make -DBATCH install
root@node4ans:~ # rehash
root@node4ans:~ # which python2.7
/usr/local/bin/python2.7
root@node4ans:~ # ln -s /usr/local/bin/python2.7 /usr/bin/python
Create ansible automatization
We will create two group of servers. all – all servers will be here and webservers – only web servers will be here. Configurations will be in the /etc/ansible/hosts file as following:
root@ansmaster:~# cat /etc/ansible/hosts | grep -v “#” | grep -v ‘^$’
[all]
node1ans.unixmen.com
node2ans.unixmen.com
node3ans.unixmen.com
node4ans.unixmen.com
[webservers]
node2ans.unixmen.com
node3ans.unixmen.com
For example with -m(define the using module) option we will use ping module and send ping to all members of “webservers” and “all” groups. You can get list of all modules from the http://docs.ansible.com/ansible/list_of_all_modules.html official page.
root@ansmaster:~# ansible -m ping webservers
node3ans.unixmen.com | success >> {
“changed”: false,
“ping”: “pong”
}
node2ans.unixmen.com | success >> {
“changed”: false,
“ping”: “pong”
}
root@ansmaster:~# ansible -m ping all
node4ans.unixmen.com | success >> {
“changed”: false,
“ping”: “pong”
}
node3ans.unixmen.com | success >> {
“changed”: false,
“ping”: “pong”
}
node2ans.unixmen.com | success >> {
“changed”: false,
“ping”: “pong”
}
node1ans.unixmen.com | success >> {
“changed”: false,
“ping”: “pong”
}
With command module you can send system commands to all client machines:
root@ansmaster:~# ansible -m command -a “uptime” all
With SHELL module you can send system commands to all client machines:
root@ansmaster:~# ansible -m shell -a “hostname” all
node1ans.unixmen.com | success | rc=0 >>
node1ans
node3ans.unixmen.com | success | rc=0 >>
node3ans.unixmen.com
node2ans.unixmen.com | success | rc=0 >>
node2ans.unixmen.com
node4ans.unixmen.com | success | rc=0 >>
node4ans.unixmen.com


