What are NVIDIA Drivers?
NVIDIA drivers are software packages that allow your operating system and programs to make the best use of your NVIDIA graphics card. They provide the necessary instructions for your OS to communicate with your GPU, enabling features like hardware acceleration, improved graphics performance, and support for the latest games and applications. This guide will show you how to uninstall Nvidia drivers on any operating system.
Reasons to Uninstall NVIDIA Drivers
There are several reasons why you might need to uninstall your NVIDIA drivers:
- Upgrading to a newer driver version
- Switching to a different GPU brand
- Troubleshooting graphics-related issues
- Performing a clean installation of your operating system
- Resolving conflicts with other software
Preparing to Uninstall NVIDIA Drivers
Before uninstalling your NVIDIA drivers, take these preparatory steps:
- Back up important data
- Create a system restore point (on Windows)
- Close all running applications
- Disable antivirus software temporarily
- Ensure you have administrator privileges
Uninstalling NVIDIA Drivers on Windows
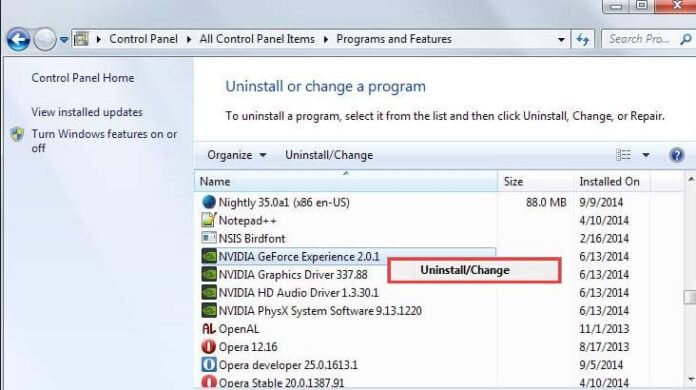
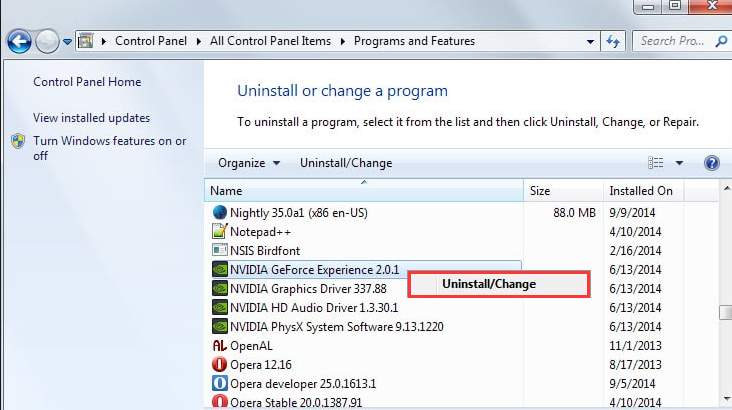
Using Windows Control Panel
- Open the Control Panel
- Go to “Programs and Features” or “Uninstall a program”
- Find “NVIDIA Graphics Driver” in the list
- Right-click and select “Uninstall”
- Follow the on-screen prompts to complete the uninstallation
On NVIDIA’s Clean Install Tool
- Download the NVIDIA Clean Install tool from the official website
- Run the tool as administrator
- Select “Custom (Advanced)” installation type
- Check the “Perform a clean installation” box
- Follow the prompts to uninstall the current drivers and install the new ones
Using Display Driver Uninstaller (DDU)
- Download DDU from a reputable source
- Boot Windows in Safe Mode
- Run DDU and select “Clean and restart”
- Let DDU remove all NVIDIA drivers and restart your PC
Uninstalling NVIDIA Drivers on Linux
The process may vary depending on your Linux distribution and how the drivers were installed.
For Ubuntu and Debian-based systems:
- Open Terminal
- If drivers were installed via apt, use:
sudo apt-get purge nvidia*
- If drivers were installed manually, navigate to the NVIDIA driver directory and run:
sudo ./NVIDIA-Linux-x86_64-xxx.xx.run --uninstall
(Replace xxx.xx with your driver version)
For Arch-based systems:
- Open Terminal
- Use the command:
sudo pacman -R nvidia nvidia-utils
Uninstalling NVIDIA Drivers on macOS
Apple has discontinued support for NVIDIA GPUs in recent macOS versions. However, if you’re using an older version:
- Open Finder and go to /Library/Extensions
- Find and move any NVIDIA-related kext files to the Trash
- Go to /System/Library/Extensions and repeat step 2
- Restart your Mac
Cleaning Up Leftover Files
After uninstallation, you may want to remove any leftover files:
- On Windows, check:
- C:\Program Files\NVIDIA Corporation
- C:\ProgramData\NVIDIA Corporation
- On Linux, check:
-
/etc/X11/xorg.conf.d/
-
/usr/lib/nvidia-xxx/
(where xxx is the version number)
-
- On macOS, check:
- /Library/PreferencePanes for any NVIDIA preference panes
Verifying the Uninstallation
To ensure the drivers are completely uninstalled:
- On Windows, check Device Manager for any remaining NVIDIA devices
- On Linux, run
lsmod | grep nvidia
to check for any NVIDIA modules still loaded
- On macOS, check System Report for any NVIDIA components
Troubleshooting Common Issues
- Black screen after uninstallation: Boot into safe mode and install generic display drivers
- System instability: Perform a clean boot to identify conflicting software
- Uninstaller not working: Use third-party tools like DDU (for Windows)
- Remnant files: Manually delete leftover folders and registry entries (be cautious!)
Reinstalling NVIDIA Drivers
If you need to reinstall the drivers:
- Visit the official NVIDIA website
- Use the automatic driver detection tool or manually select your GPU model
- Download the appropriate driver package
- Run the installer and follow the prompts
Best Practices for Driver Management
- Always download drivers from official sources
- Keep drivers up to date, but avoid beta versions for stability
- Create system restore points before major driver changes
- Use driver management software for automatic updates
- Keep your operating system updated
Remember, uninstalling graphics drivers can temporarily leave your system with reduced functionality. Always have a plan to reinstall drivers or switch to integrated graphics if necessary.
Similar Articles from Unixmen
NVIDIA Releases A New Beta Of Its Graphic Driver For Linux 32-bit
NVIDIA 304.64 has been released! A look at new features and Instalation instructions


