
Introduction
Two variable of java are available, JRE (Java Runtime environment) and Java Development kit or JDK. JRE comes with minimal tools to create java applications. JDK is full fledged toolkit which have everything which is required to create a java applications. For previous versions of Ubuntu java installation tutorials are already published with unixmen.com, you can visit out website to have a look. You can have all of versions installed on your Ubuntu system but need to make default any one of them.In this tutorial w ewill install 3 versions of java (oracle, jdk, jre) and will make jre is default one.
Installation
update your system
# apt-get update
Verify if java is installed or not
# java -version
If there is no java package installed ye, output will be something like
The program 'java' can be found in the following packages:
 * default-jre
 * gcj-4.9-jre-headless
 * gcj-5-jre-headless
 * openjdk-7-jre-headless
 * gcj-4.8-jre-headless
 * openjdk-6-jre-headless
 * openjdk-8-jre-headless
 * openjdk-9-jre-headless
Try: apt install <selected package>
So, we need to install java.
There is two flavors of java available to install, one is open source and another from oracle.
install open source version first, press y to install
# sudo apt-get install openjdk-7-jre
In same way you can install jdk version
# sudo apt-get install openjdk-7-jdk
Install oracle version of Java, need to install few prerequisites
# sudo apt-get install python-software-properties
Add Oracle Java repo
# sudo add-apt-repository ppa:webupd8team/java
Press enter and update system
.
.
.
More info: https://launchpad.net/~webupd8team/+archive/ubuntu/java
Press [ENTER] to continue or ctrl-c to cancel adding it
gpg: keyring `/tmp/tmpm2b6ngwv/secring.gpg' created
gpg: keyring `/tmp/tmpm2b6ngwv/pubring.gpg' created
gpg: requesting key EEA14886 from hkp server keyserver.ubuntu.com
gpg: /tmp/tmpm2b6ngwv/trustdb.gpg: trustdb created
gpg: key EEA14886: public key "Launchpad VLC" imported
gpg: no ultimately trusted keys found
gpg: Total number processed: 1
gpg: imported: 1 (RSA: 1)
OK
Update system
# apt-get update
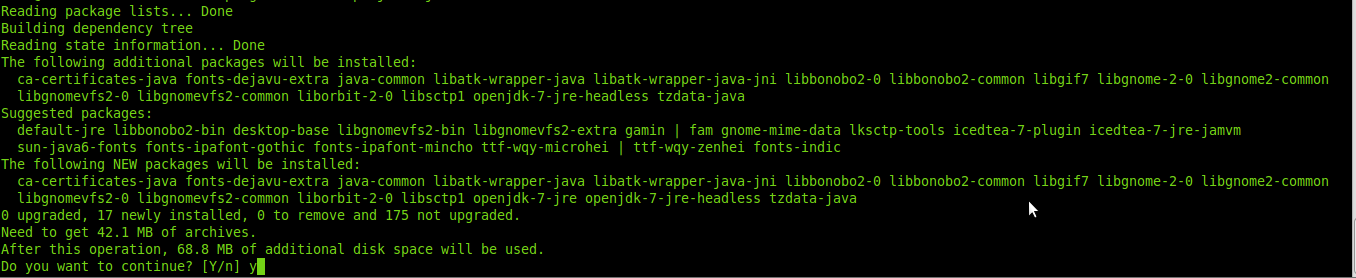
Install package
# sudo apt-get -y install oracle-java8-installer
Press enter, press ok
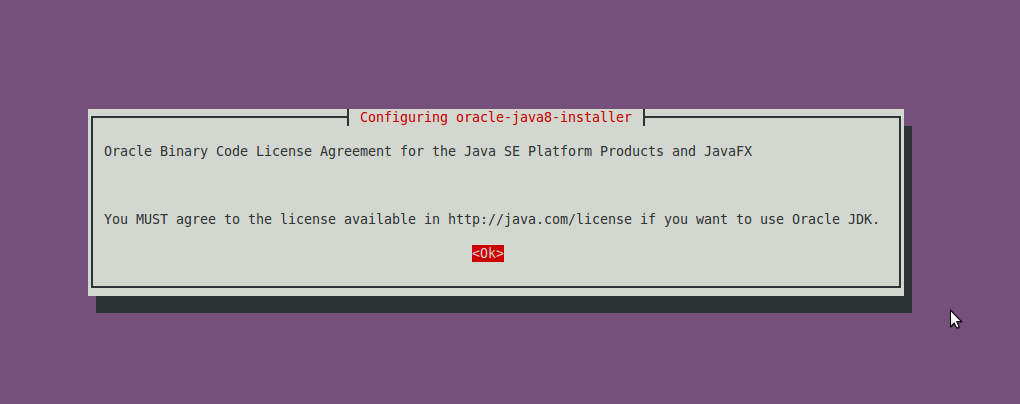 Select ok, press enter

Installation will be complete with following message
.
.
Oracle JRE 8 browser plugin installed
Setting up gsfonts-x11 (0.24) ...
Now have a look what we have installed
# java -version
Sample output
java version "1.8.0_74"
Java(TM) SE Runtime Environment (build 1.8.0_74-b02)
Java HotSpot(TM) 64-Bit Server VM (build 25.74-b02, mixed mode)
As we have three different flavors of Java installed, let us find appropriate path for java version you wants to make default
root@um-VirtualBox:~# java -version
Sample output
java version "1.8.0_74"
Java(TM) SE Runtime Environment (build 1.8.0_74-b02)
Java HotSpot(TM) 64-Bit Server VM (build 25.74-b02, mixed mode)
root@um-VirtualBox:~# sudo update-alternatives --config java
There are 2 choices for the alternative java (providing /usr/bin/java).

Selection Path Priority Status
------------------------------------------------------------
* 0 /usr/lib/jvm/java-8-oracle/jre/bin/java 1072 auto mode
1 /usr/lib/jvm/java-7-openjdk-amd64/jre/bin/java 1071 manual mode
2 /usr/lib/jvm/java-8-oracle/jre/bin/java 1072 manual mode

Press <enter> to keep the current choice[*], or type selection number:
You can see Oracle-Java is default java environment for now, let us change it to jre, select 2 and press enter.
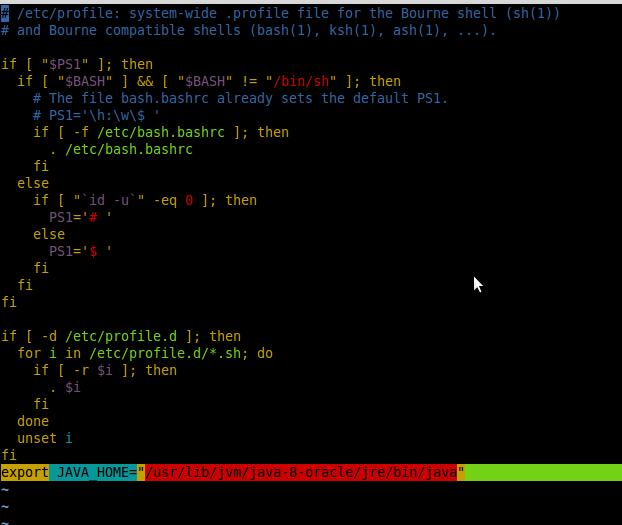
Open and edit /etc/profile file
# vim /etc/profile
Put following line in last line of the file, copy jre path from previous command:
Reload this file, so that changes can get applied effectively.
# source /etc/profile
Verify default JAVA_HOME is effectively modified or not
# echo $JAVA_HOME
Output
# /usr/lib/jvm/java-8-oracle/jre/bin/java
So, now you have installed java successfully on your Ubuntu 16.04 machine. Have fun!!


